How to germinate Durio species seedsDurian seed germination [Archive]Durio species, collectively referred to as Durians, are a very unique and special tropical fruit. They originate from SE Asia and have for many years being considered the "King of Fruits". They can grow to over 8kg in weight, be about the size of a basketball, and are covered in variable spikes. Many species are hard spiked, while some are soft. The fruit is what gains real attention. Some species have incredibly strong odor, many people being literally revolted by it, while other types are all but odorless. The fruit also varies quite considerably from a very strong opinions flavor, to a creamy sweet taste. Textures can go from firm to pudding like to almost wet. Durio is a truly variably fruit genus, but luckily seeds, although finicky, germinate in much the same manner. The biggest issue with all Durio species is their seeds are recalcitrant. This is common with a lot of ultra-tropical species and means that seeds cannot be stored long before they die. In the case of Durio, seeds can be stored successfully anywhere from 3-20 days (many say 1 week). Because of Durio requiring immediate germination, seeds may not be stored and sent, they must be harvested and mailed or planted as soon as possible. This article will be mainly implying use for Durio zibethinus, however seed germination methods have held true for many different wild species we have collected and imported throughout Asia. | ||
Harvesting seedsIt is our opinion that harvest time is the most critical aspect of Durio seed success. When seeds are fully mature and ready, they are fairly easy to grow. Most Durio fruit will split open when fully ripening, and this is the ideal time to harvest the seeds. Not all species will split, so some non-commercial species may need to be opened by hand, which means paying attention to color, texture and perhaps scent will be needed to tell if the fruit is fully ripe. |
||
|
We have found over the years that allowing the fruit to split and waiting an additional 2-3 days is far better as the seeds of many durian species will start germinating inside the fruit. This unfortunately likely means the fruit will be spoiled, most likely by bugs, and will not be great to eat. When the fruit splits and a couple days have passed, and the fruit meat is starting to turn color (darker), it is a good time to harvest. I would even say wait until the very first signs fo mold, as that will allow maximum in fruit ripening before fungus takes its toll. Mold should not be allowed to spread far, fungal pathogens are a big problem for some people germinating durian seeds. | ||
|
The seeds should be washed with clean water when they are harvested from the fruit. We want to avoid damaging the "eye" of the seed, as this is where the hypocotyl (and eventually tap root) push out of the seed and we don’t want to damage it. Simply rubbing the remaining fruit pulp off the seed as best you can, without tearing strips of seed coat off, is adequate. This is simply to wash away most of the sugars that will greatly increase the chances of fungi spores germinating and attacking the seed. |
||
What Durian Seeds WantWe have used multiple methods for germinating durian seeds and time and time again we just keep going back to the basics of what it wants. So let’s briefly go over the requirements of Durio species seed germination. This may hold true for many tropical species as well. Temperature: Durian seeds need to be maintained at a fairly consistent temperature that is quite warm. 25c or higher at all times. Lower temperatures have worked, but germination rates drop and times increase. Keeping them at a constant 28-29C we have found to be ideal growing them in southern Taiwan. We also find that soil temperature down to 24C is fine, with air temperature being slightly warmer having good effects. Humidity: Humidity needs to remain high, 90% or thereabouts. Most people confuse this with wet or moist, they do not like being wet, but really like being humid! It is so important no to sacrifice air quality for humidity, always find a way to increase humidity, do not decrease air flow. Air quality: For people growing durian outside of the tropics, things get a little trickier. High temperatures and humidity levels need to be maintained, but not everyone thinks about the alterations they are making. When growing outside, there are far few pathogen problems as compared with indoors. Indoor air quality is usually very poor due to things like a lot of organic things growing small fungi and releasing spores. Indoors is also lacking in adequate air flow, generally having very stagnant air in relation to outdoors. Lastly outside has UV light from the sun, which cannot be matched with the best indoor lighting, and also has far great natural beneficial organisms. We believe, if your climate allows, growing outdoors even at germination stage is far better than doing the same indoors. If growing indoors and air quality is going to be poor, it will be tricky to maintain the right temperature and humidity without sacrificing fresh air exchange. Air should change through completely every couple minutes ideally, this will greatly reduce fungal rot and especially bacterial rot as things will not be so moist all the time. This also requires more attention by the grower to make sure things do not dry out. Moisture & Water: One of the most common mistakes people seem to have with germinating durian seeds is that they keep them too wet. Although they are from the tropics they don’t like standing in constant moisture, even the seeds. The idea is to provide maximum humidity, not high moisture. You want the area to feel "sticky" but when you rub the seeds your fingers should not become wet from condensed moisture forming on the seeds. We want to think about 2 things primarily. High humidity without causing actual moisture buildup on the seeds (the soil should be kept slightly moist all the time). And good fresh air exchange. Many materials are great at one or the other but fail at doing both adequately. So what we want is a fairly airy medium that can hold moisture in its body to maintain a high humidity in all of the air pockets it provides. We find clean sphagnum moss to be almost perfect in this regard. Large grade vermiculite and perlite/pumice also works well. We prefer and recommend using the sphagnum moss however and will continue the procedure using that as our medium below. When the soil starts drying out, water it a little, not so it drains through as you would a real plant, but just to wet the material in order for it to hold a high humidity and avoid dehydration of the seed. Soil: We opt for a medium clay type soil (from outside) mixed with coco coir and medium washed sand in a 50:20:30 ratio. We may also add some pumice at about 3-7mm grade. This is to allow faster drying times of soil which helps prevent pathogens, but at the cost of having to water more frequently. Light: We have noticed that Durio seeds that are exposed to light start to discolor and become hard to germinate. I am not totally clear on why but I believe this is due to exposure more than light and is due to simple dehydration causing color loss. Dehydrating durian seeds are bad news and become increasingly harder to germinate the longer they are exposed to open air and light. Although the seeds should not be exposed to light, at least until the tap root shows, it is important to provide it. This is probably most important to avoid rot, but the seedling will soon need it anyway. We prefer sunlight under 60-70% shade cloth, but under T5/T8 fluorescent fixtures about 15cm away will also suffice. | ||
How to plant durian seedsThe system we have worked out after killing untold numbers of many different Durio species is as follows. Take a tray/pot that is at least 10cm deep. It doesn’t need to be too deep as they can be transplanted to larger pots at a later time once they have started growing. Fill the container with the soil mentioned above, leaving 3-6cm at the top free. Take your durian seeds and place them on top of the soil without burying them, just sitting them on top so they won’t tip over. Plant them lengthwise with the "eye" pointing more towards the soil. It is not super critical as the tap root will grow down with gravity. |
||
|
Take some clean sphagnum moss and soak it in water until it is fully hydrated. Squeeze it in your hand as hard as you can to get most of the water out, this will make it slightly moist but not wet. Loosen up the moss and sprinkle it on top of the seeds filling to the top of the pot. The moss should be placed very loosely to allow good air flow, but to cover the seeds and protect from light and exposure to dehydration. Another method we have used quite a lot, and sometimes come back to, is filling a tray about 4-5cm deep with moistened sphagnum moss. Place the seeds as you would above on the soil, but onto the moss. Here the moss serves as the medium providing constant humidity and little bit of moisture. Once the durian seeds re placed on the moistened sphagnum moss, cover them with about 2cm of loose moss, also moistened, and keep in shaded light. Once the seed start germinating, they can be placed onto soil as above. This has the advantage of being able to sow a bunch of seeds from the same collection/tree and not have to setup all the pots until you know they have germinated. That is basically it! It is really that easy, the only things that must be monitored and maintained are fresh air, humidity and temperature. | ||
Common problems with germinating durian seedsBrowning of seed and not germinating is usually caused from drying out. When seeds are exposed to open air, which is often drier, they will discolor and often the seed coat becomes too hard for the tap root to penetrate and the seed dries/rots. The seed won't come off the seedling often because they are just slow. When grown in high humidity they should shed the seed on their own. Durian are slow to start! It is important not to bury the seeds, as the see will not often come out of the soil when germinating and sometimes this leads to the tip of the plant rotting. If humidity is too low, the seed coat can dry up pretty hard and constrict or stick to the plant itself, also causing problems. Unlike some other tropical plant species, the durian seedling will form right inside the seed, and the seed itself remains a big bulk shape surrounding it, making it very easy for them to stick or for the seed itself to break the fragile young stem. The seedling is wrinkled due to dehydration. Many things can cause dehydration, and it isn’t always lack of water in the soil. If the soil isn’t dry, it is likely a root problem, probably rot. Mold is a very common problem with such tropical fruit seeds, and is not overly bad in the case of Durio. White slimy molds and bacteria are the worst and are signs of very moist and likely stagnant and hot environment. Mold can be wiped off seeds, and should be expected when seeds are mail ordered. Keep the mold down manually until the plant is growing in soil. | ||
A photographic timeline of Durian seed germination | ||||
1. Intact unripe Durian species. |
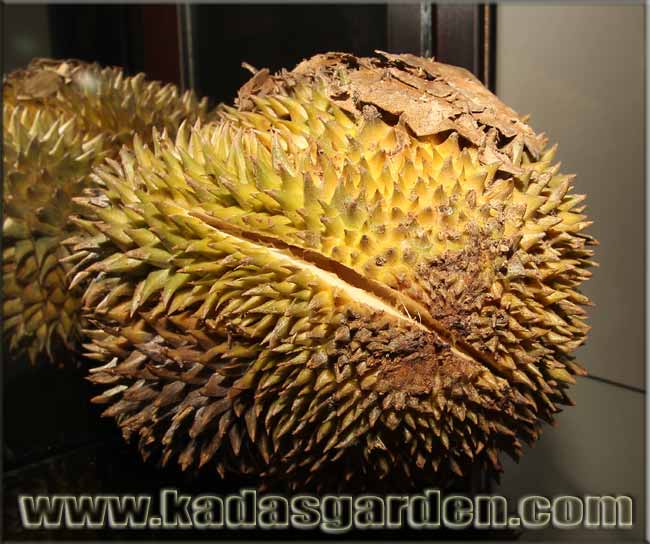
2. Durian starts to split, ripe. |

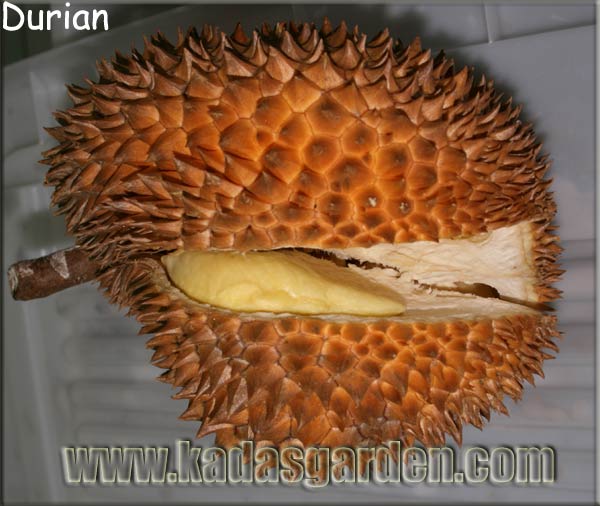
3. Durian fruit is split open to reveal the edible fruit and seeds. |
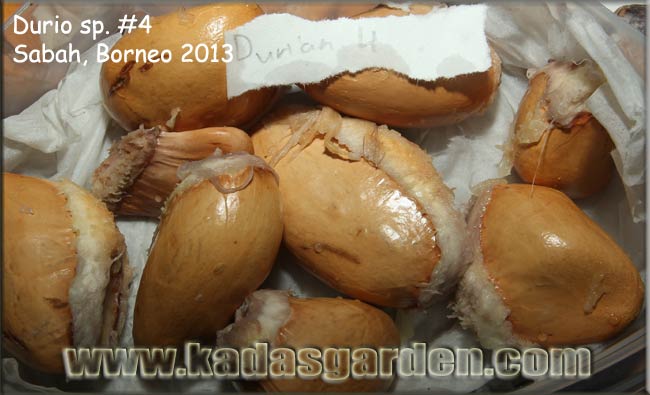
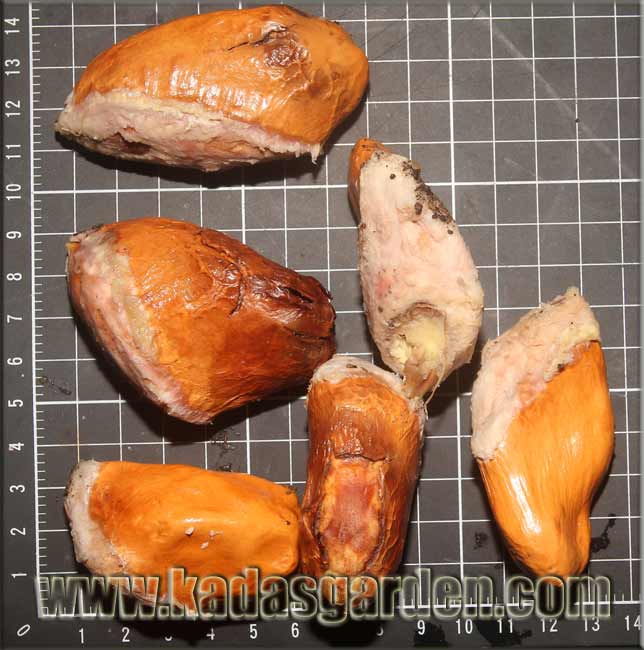
4. Clean the seeds and rinse it of sugars. | 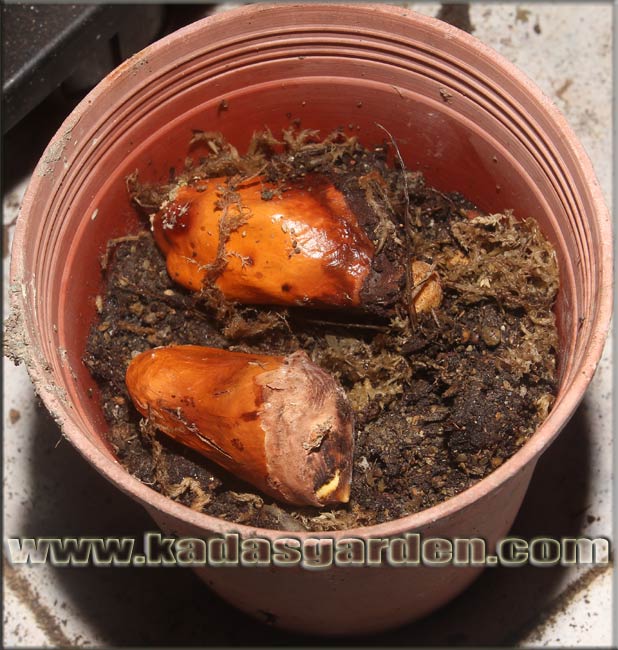
5. Seeds are planted on top of soil to germinate. |
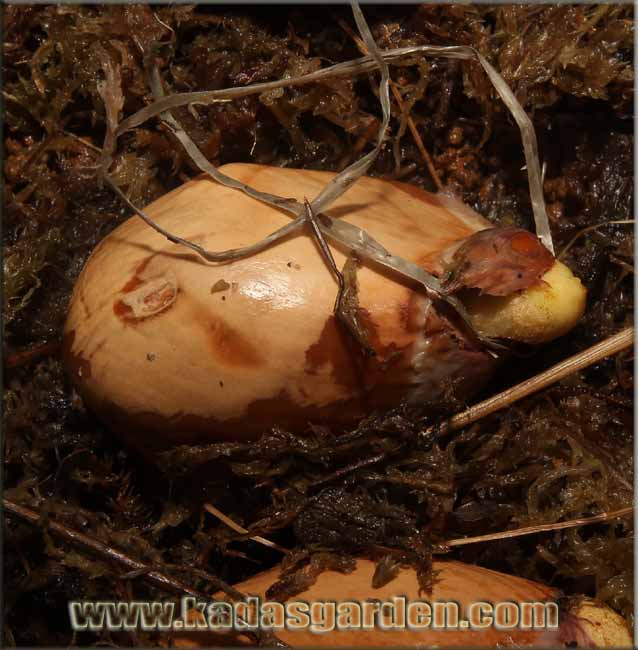
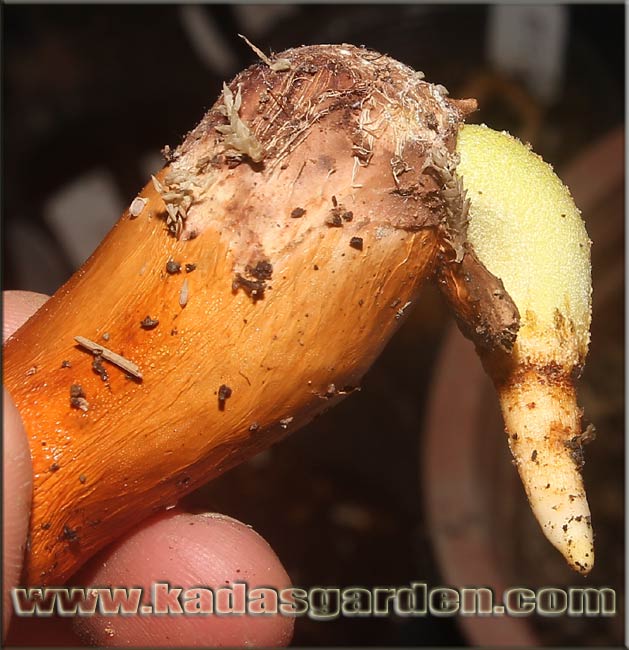
6. Durian seed just starting to germinate. |
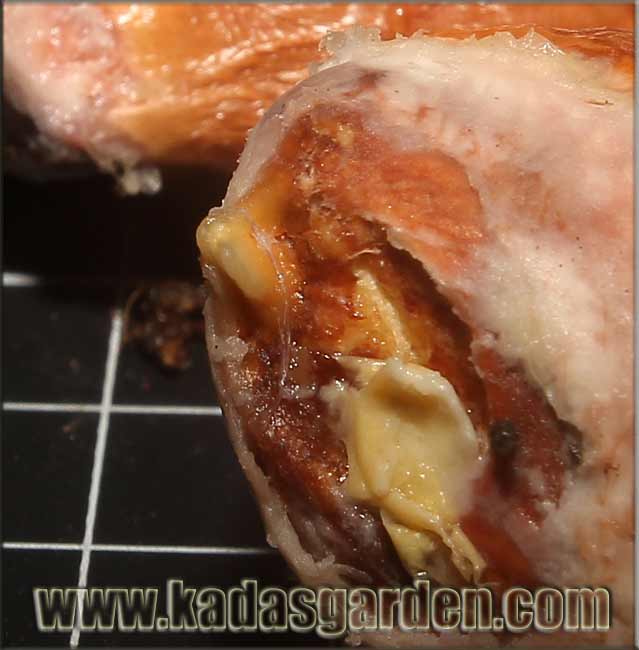
7. Seed is germinated and growing. |
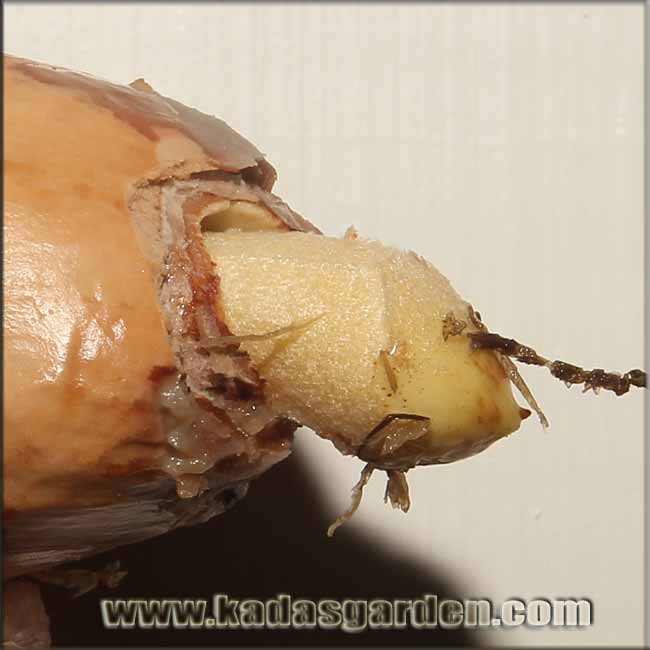
8. Hypocotyl and root differentiation and growth. | 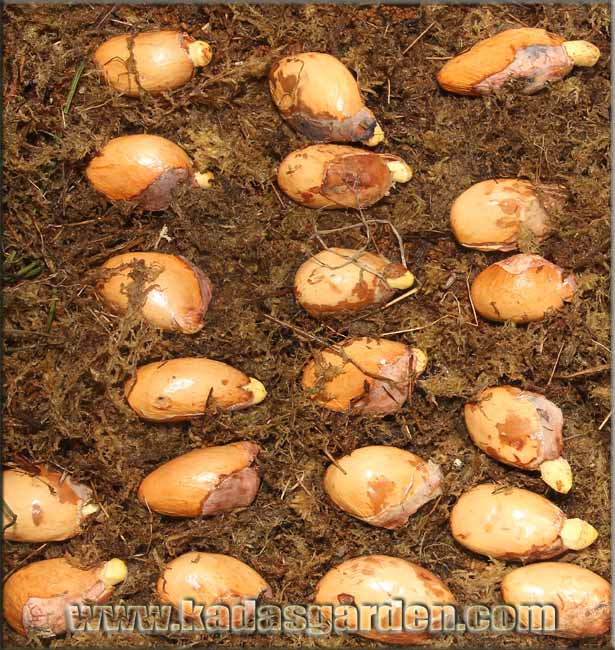
9. Durian seeds germinating on sphagnum moss. |
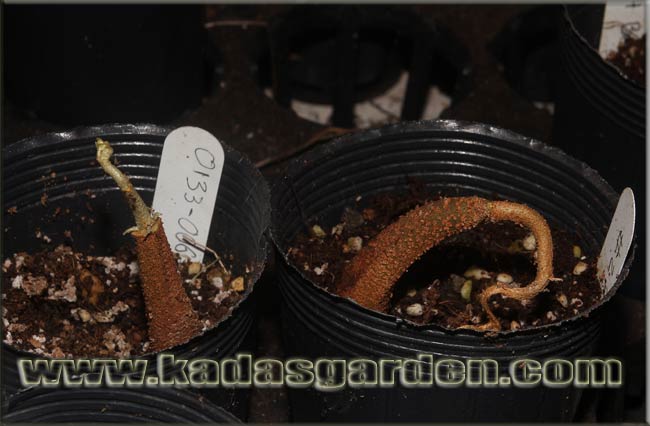
10. Transplanted seeds now growing into a plant. |
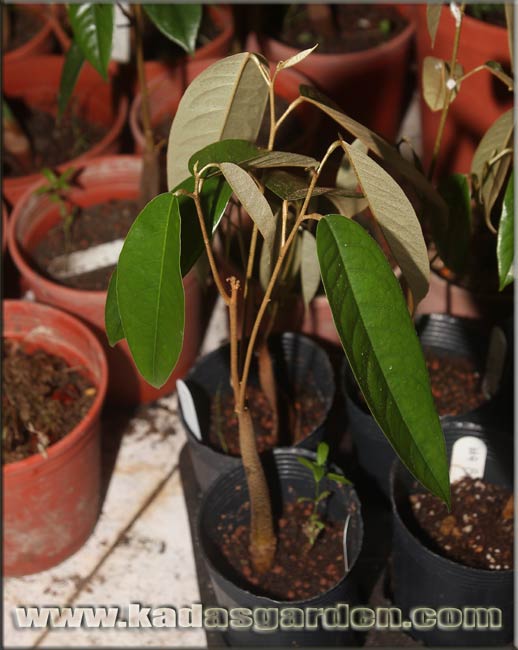
11. Durian seedling healthy and growing. |
||||